

Why Do You Need A Good Camera Rig?
While it’s possible to shoot great video with just a camera and lens, many filmmakers find they need additional accessories. Most cinema cameras come with an array of mounting options for adding accessories like monitors, external recorders and matte boxes. However, the scope for expanding a DSLR or camcorders is often more limited. The ergonomics of cameras designed primarily for taking still images are not ideal for shooting video. You need a rig.
Best Run-and-gun Rig
Zacuto Indie Recoil Pro V2
- The Zacuto Indie Recoil Pro V2 rig is suitable for all cameras, including mirrorless and DSLRs. It includes a half cage and top handle along with the VCT Pro base plate with a built-in shoulder pad. This rig also features 6-inch iris rods and a wealth of mounting options. The QR Riser adds a quick-release mount for your camera while the Trigger Grip provides easy handle adjustment. The rig is designed for optimal balance when used on a tripod or shoulder-mounted. You will need to add an electronic viewfinder in the latter configuration, however, which does increase the cost considerably
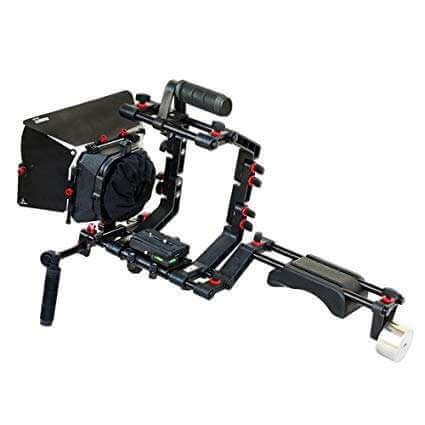
Budget Run-and-gun Rig
Manfrotto SYMPLA Lightweight Shoulder Mounted Rig
- With the Manfrotto SYMPLA Lightweight Shoulder Mounted Rig, Manfrotto promises a ready-to-use rig with flexible configuration options. It comes with a pair of 12-inch rods and a pair of 6-inch rods, both using the 15mm standard. Adjustable ball head handles, an H-Offset connector and a camera mount with the quick-release plate are also included. The setup also includes a shoulder pad and a stackable SYMPLA Light Counterweight to provide stability and balance.
Best All-around Rig
Tilta DSLR Shoulder Rig
- This basic shoulder rig comes with a baseplate and 15mm rods. Also included is a follow focus system complete with still lens adapter. The kit features a universal handgrip with two handles, an adjustable shoulder pad and a counterweight to help keep the rig balanced. The shoulder pad pivots for added comfort, and the included support bracket and rods give you lots of mounting options.
Budget All-around Rig
Revo SR-1500 Dual Grip Shoulder Support Rig
- This stripped-down shoulder rig gives you a solid foundation for expanding your setup down the line. The rig includes two 22-inch 15mm rods, a shoulder pad, and an offset handlebar with two handgrips. It also has a rod clamp with both ¼”-20 and ⅜”16 threaded screws for mounting your camera. You can also mount the rig to a tripod using the threaded screws on the bottom of the shoulder pad.
Best Hybrid/Photo Rig
Tilta ES-T17-A V2
- This compact cage setup is perfect for small cameras. Models are available to fit most Sony mirrorless cameras without blocking access to the SD card or battery slots. The form-fitting cage also provides a degree of protection when shooting out in the field. Along with the cage, the rig also includes two 12-inch 15mm rods and removable top handle. It’s the handle that makes this rig ideal for hybrid use since portrait-oriented shooting is more common in photography.
Budget Hybrid/Photo Rig
SmallRig 2096
- Like the Tilta ES-T17-A V2, the Smallrig is a form-fitting cage for Sony mirrorless cameras. It’s designed specifically for the Sony a 7 111 and a 7R 111. An abundance of mounting points on this cage allows for mounting lots of additional accessories. Plus, a removable top handle should make it easier to get shots at different angles and orientations.
Factors to Consider When contemplating your first rig
When contemplating your first rig, there’s often a temptation to expand your setup into a behemoth of scaffolding and wires. Nonetheless, it’s important to assess your needs to ensure that your rig enhances your filmmaking. How what and where you’re shooting will determine what you need in a rig. If you’re shooting from a skateboard, you’re going to want something small so as to not restrict your movement. However, if you’re shooting indoors on a tripod, then you can afford to work with a rig that’s more comprehensive.
The beauty of a rig is that it is modular. You can start small then expand to add new features as needed. Most rig systems use the same fittings so you can mix and match between different manufacturers. This makes upgrading simpler and saves money since you can reuse older components.
- Rig design
- When planning your rigs, consider the joints of the body and how they affect camera movement and operating fatigue. Most of the fine shake that shows up in hand-held camera shots comes from the wrists. Nonetheless, having your elbows out while operating can help you to get tilted or Dutch angle shots. This does put more strain on your arms, however. The handles on a rig should allow you to keep both elbows pressed into your torso. This will help eliminate unwanted camera movement.
- Weight
- That said, many operators find the added weight of a camera rig can make shooting handheld easier. However, it’s important to ensure that your rig is well balanced. If you’ve ever worked handheld with a larger camera, you’ve probably noticed that the added weight makes it easier to obtain steady shots. Larger shoulder-mounted cameras are designed so that their center of gravity sits over your shoulder.
- Balance
- Unfortunately, the need to see the screen on the back of a DSLR often means that the camera sits forwards on the rig. This increases the weight and strain on the operator’s hands and wrists, leading to fatigue and camera shake. Adding a metal weight or external battery to the back of the rig acts as a counterbalance and will reduce fatigue. This, in turn, will improve stability even though overall the rig is heavier.
- Before choosing your first rig you should carefully review your camera size and weight as well as your existing camera support
- Compatibility with other gear
- Before choosing your first rig, carefully review your camera’s size and weight as well as your existing camera support. Keep in mind the extra weight a rig will add when considering what your tripod or other support can handle. If you like to run and gun, stick to the basics with your rig. If your shooting style is more pre-planned, more support and a set of accessories will help you along.
- Mounts and Cages
- This is where your rig starts. A mount is simply a platform to which you can attach your camera. Mounts vary in size and some include attachments for rods or rails. A mount that incorporates a quick release plate makes it easier to swap your camera between different set-ups
- As well as providing a mount for your camera, cages protect the camera body. They also provide attachment points for accessories. Many cages also have cable clamps to help prevent the monitor or external recorder cables from coming unplugged. Long shoots with DSLRs and mirrorless cameras can require a lot of battery changes. Make sure that your camera’s battery door remains accessible when choosing a cage.
- Remember, you can attach a mount to most cameras whereas a cage will only fit a specific camera model. If you change cameras in the future, you may need a new cage.
- Rods and rails
- Over the years, standards have been developed regarding the way equipment attaches to camera rigs. This has allowed companies to build gear that is cross-compatible. Rails and rods allow equipment to be attached linearly on a rig. Rod systems usually use a 15mm standard for light gear and 19mm for heavier equipment.
- Rods extending in front of the camera can be used to add matte boxes, follow focus units or supports for larger or heavier lenses. To the back of a rig, rods can be used to add a shoulder pad or mount for an external battery system.
- The two most commonly seen rails are the ARRI dovetail and NATO rail standards. Rails can be used to attach a range of accessories including top handles, monitor arms and cable clamp brackets.
- Rosettes
- Rosettes allow the attachment of equipment at different angles. They are well-suited for attaching handles to rigs. Rosettes are seen in a number of sizes, but the ARRI rosette is one of the most common.
- With that in mind, as you shop, be conscious of what each piece of your rig needs to support, how it needs to move and adjust and where it needs to attach to the rest of the rig. If your cage supports 15mm rods and you buy the 19mm version, you’re obviously going to have problems.
- Handles
- Adding a top handle can help you get smooth footage when filming low-level shots and makes your rig easier to transport. However, be careful when adding a top handle to the cold or hot shoe on a DSLR. These are not usually designed to be weight-bearing.
- A better option for mid to heavy-weight rigs would be to add a handle to the camera cage, rather than to the camera itself. A single vertical handle at the front of a rig is good for short takes, but if you’re shooting or walking for a prolonged period, having a second handle will offer more comfort and control.
- Shoulder Pads and Braces
- Moreover, if you’re shooting handheld a lot, you’ll want extra support. As well as spreading the load to reduce fatigue in your arms and wrists, having an additional point of contact with your body will increase the overall stability of your shots.
- For minimal, lightweight rigs, a brace that rests on the front or top of the shoulder will often suffice, giving support without adding much weight or bulk. On heavier rigs, it’s better to have the extra support of a curved shoulder pad, possibly with the addition of a counterbalance weight to shift the center of gravity backward, especially if the camera is positioned to the front of the rig.
- Arms
- While many film-making accessories are designed so that they can be attached to a rig, you need to ensure that your set-up is configured in an optimal way for the project you are filming.
- Arms allow you to add gear like monitors and lights in a way that allows their position to be adjusted while ensuring that camera body controls are kept clear.
- Mounts
- Mounts range from something as simple as a cold shoe for a microphone to a specialized bracket to attach an external SSD drive for longer recording times.
- Adapters
- Even though rig components are largely designed to be compatible across different manufacturers, there are times when you will find something that doesn’t quite fit, such as 1/4-20 thread screw when your rig only has a spare 3/8-16 hole. Don’t worry – there is an adapter out there to connect it all together. It’s useful to carry a collection of the more common adapters in your kit bag.
- Lens Support
- For some camera body and lens combinations, you’ll need dedicated support for the weight of the lens. This often becomes a necessity when using cinema or full-frame lenses on small mirrorless camera bodies, as their lens mounts aren’t designed to support such heavy lenses.
- As a result, the use of large lenses with lens adapters such as the Metabones range can also increase the strain on a camera’s lens mount. There are many options for lens supports that attach via 15 or 19mm rails. Some lenses and adapters even have integrated lens supports that can attach to your rig.
- Focus Controllers
- Being able to control lens functions away from the lens and camera can be a huge help. From cinema-style follow focus to electronic focus and zoom controllers, there are a lot of options around. Follow focus units can be used for zoom or iris control on manual lenses. There are also many inexpensive add-on focus gears for still lenses to adapt them for use with a follow focus if you don’t have cine lenses.
- Matte Boxes and Lens Hoods
- Many camcorders and some camera lenses come with lens hoods to help improve the contrast in your image and prevent lens flares. Matte boxes are larger and more configurable than lens hoods and so offer even greater benefits to your image quality. Similarly, most lens hoods attach directly to your lens while matte boxes usually mount to the front rods of your rig.
- Matte boxes have flags that can be moved and positioned to cut out any unwanted light —think barn doors for your camera lens— and are built to hold large format filters in one or multiple slots. This style of the matte box gives you a lot of functionality and also gives your rig a real cinema look.
- Some matte boxes are designed with a special bracket that allows them to swing to one side making it easier and quicker to change between lenses.
- Quick Release Plates
- If you plan to go from tripod to handheld, then a quick release plate on the bottom of the rig is a must. Having the same quick-release on all of your support gear can save you a lot of time.
- Accessorize, Accessorize, Accessorize!
- The placement of accessories and equipment on your rig will affect its weight and balance. It’s also important to ensure that the gear you add to your rig is easy to use and doesn’t interfere with another component of the rig. As a result, watch out for microphones and lights attached to your rig being blocked by monitors or matte boxes for example.
- External batteries are heavy but mounted to the back of the rig, they can take the place of a counterweight and improve the overall balance of the rig.
- Complete Rigs
- When buying your first rig you can start with a simple and inexpensive setup then build onto it to develop and adapt your setup as your needs change and you can afford new gear. There is also a wide range of complete rigs on the market that can be used both handheld and mounted to a tripod.
Parting Advice
Rigs allow you to mount a wide range of accessories and the temptation can be to max out your rig just because you can. But ideally, your rig should include only the extra gear needed for the job you are working on. That way, you can optimize your setup and workflow without extra clutter. Whether you design your own custom set of rig component or buy a complete rig off the shelf, start your search for the perfect rig with a good understanding of the work you’ll be doing and the tools you’ll need to get it done.


Comment (1)
Minimalist Leather Wallet
December 7, 2020Thanks for the terrific information for us.
Best regards,
Thompson Raahauge
Comments are closed.