Methods Of Recording Sound On Film (SOF)
What Is Sound-on-film?
Sound-on-film is a class of sound film processes where the sound accompanying a picture is recorded onto photographic film, usually, but not always, the same strip of film carrying the picture.
What Are The Methods Of Recording Sound On Film?
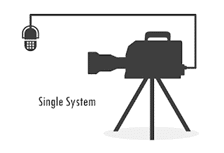
When it comes to film and video sound, the first thing you need to determine is whether to use a single or double audio recording system.
What Is A Single Recording System?
A single system recording, is where audio is captured directly into the camera, and records simultaneously with the image. For a double or dual system, sound is captured independently of the camera and onto a digital audio recorder.
What Is A Double Recording System?
A Double-system recording is a form of sound recording used in motion picture production whereby the sound for a scene is recorded on a machine that is separate from the camera or picture-recording apparatus.
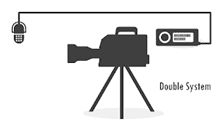
- This procedure requires that both camera and sound recorder share a very accurate time reference and that the speed of the camera and sound recorders be carefully governed.
What Is The Main Difference Between Single And Double System?
In a single system, audio is captured directly into the camera and records simultaneously with the image. For a double or dual system, the sound is captured independently of the camera and onto a digital audio recorder. For a double or dual-system audio is synced up with video during post-production.
What Are The benefits of Single-system recording Over Double-system recording?
- The benefit of a single system over the double system is that it does not require audio to be synced up in post-production. This is advantageous in news and documentary formats that often require a quick turnaround of material.
What Are The benefits of Double-system recording Over Single-system recording?
- Most motion picture camera supports this option as opposed to Single-system recording, so all production sound is recorded on a separate recorder.
- The double system is ideal if your camera lacks higher-grade audio inputs.
- The double system delivers stronger audio quality, through a higher sampling rate. The higher the sample rate, the more accurate the digital representation.
- For example, 11 kHz would be low-quality sound, and 48 kHz would be the standard for digital sound recording.
- Double systems also deliver greater bit depth. Bit depth refers to how many different values of amplitude each sound sample possesses. The higher the bit depth, the more accurate a system can record and reproduce the subtle fluctuations in a waveform.
- For example, 16-bit audio, which is standard for a digital audio recorder, can capture 65,536 different values of sound. This contributes to the richness and complexity of the sound recording.
- Audio does not have to be tethered to the camera.
Different Types Of Microphones For Recording Sound On Film
What Are The Different Types Of Microphones?
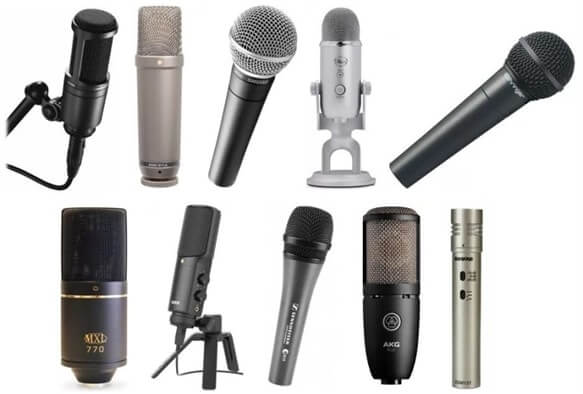
When picking out a microphone, the first thing to decide is what type of microphone you need. If you’re a vocalist who records in studios, a condenser mic is a smart choice. However, for anyone who performs live, a dynamic mic should be your go-to microphone. Time to break down the various microphone types and when to use them.
- Shot-Gun Microphones
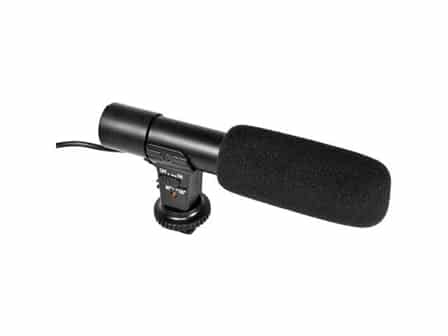
- What’s great about this zeppelin-shaped device is that it can pick up audio without capturing excess environmental noise.
- Often, the shotgun microphone is mounted to a boom pole where it can be held above or below an actor to capture dialog.
- Also, windshield accessories such as a “blimp” or the cuddly-sounding “dead cat,” fit snugly over the microphone and reduce distortion.
- Dynamic Microphones

- Dynamic microphones are what you picture when you typically think of a microphone. The same that most performers hold when singing.
- Although a dynamic mic lacks the directional capacity as a shotgun microphone, it is excellent for recording in loud spaces.
- These mics don’t require external power and lack an internal amplifier. Because of this, they tend to be used during broadcasts or performances.
- Dynamic Mics are the workhorses of the microphone world. They’re cheap, durable and sound fantastic on some of the most common sources in the recording.
- Using a movable induction coil suspended in the field of a magnet, dynamic mics work like a speaker in reverse!
- Dynamic mics are responsive to transients and handle high SPL very well. This makes them a natural choice for loud sources like drum kit close mics and guitar and bass cabs.
- Given how affordable and versatile they are, there should definitely be a dynamic mic or two in your collection. And if you only have room for one, there’s really only a single serious contender: the Shure SM57. The versatile SM57 is one of the most accessible tools in recording.
- Of course, there’s a range of great dynamic designs that work for tons of studio situations including Electrovoice RE20,
Sennheiser MD421
Shure SM7B - While all of these mics are great options, none have the grand slam price-to-performance ratio of the SM57.
It’s the go-to choice of many engineers for guitar cabs and snare drums—no home studio should be without one!
- Large Diaphragm Condenser Microphones

- Large-diaphragm condenser microphones are probably the first thing that comes to mind when you think of studio recording mics.
- They’re the large, stylish and serious-looking mics that you see in most professional recording studio situations.
- Condenser mics work by using a capacitor (or condenser) to convert acoustic vibrations into an electrical current. That means they need a power source like 48V phantom power to operate. It also means that they’re much more sensitive than dynamic mics or ribbon mics and output a louder signal.
- Their sensitivity makes them ideal for quiet or extremely dynamic sources—like vocals!
- Large-diaphragm condensers exhibit a number of sonically pleasing qualities for voices. They help create that “larger than life” sound that we associate with pro studio vocals.
- But LDCs are effective on all kinds of sources. If you’re looking for one mic that can handle every task, consider a large-diaphragm condenser.
- Many modern LDCs offer selectable polar patterns making them incredibly versatile and useful in tons of different recording situations and one of the best mics for building your studio around.
- Small Diaphragm Condenser Microphones

- Small Diaphragm Condensers (sometimes called pencil condensers) are the smaller, less flashy cousin of the LDC. But they’re just as useful, despite their small stature. Small diaphragm condensers have a great transient response, extended top end, and consistent pickup patterns.
- This makes them great for realistic stereo techniques as well as acoustic instruments. If you sat in on classical music recording session, chances are you would see mostly SDCs.
- They often come in pairs for stereo recording, so they’re particularly effective for creating accurate stereo images of real acoustic spaces.
- Ribbon Microphones

- Ribbon technology dates back to the earliest days of microphones. Photos from the golden age of broadcasting are filled with presenters speaking into classic ribbon mics.
- Ribbon microphones use an ultra-thin (wait for it) ribbon of electro-conductive material suspended between the poles of a magnet to generate their signal.
- Early ribbon designs were incredibly fragile. Moving them improperly, or even subjecting them to high SPL could cause the ribbon to break.
- But their sound was worth the trade-off in durability. Ribbon mics are prized for their warm, vintage tone.
- They’re perfect for when you need to tame excessive or harsh high-end: sources like guitar amps, drum overheads or brass.
- Ribbon microphones naturally produce a perfect figure-eight polar pattern and respond to EQ extremely well.
- Hot Tip: Even though today’s ribbon mics aren’t quite as fragile as the early designs, they’re still easier to damage than dynamics or condensers. Be careful while handling them!
The most important rule of ribbons is never EVER supply 48V phantom power to ribbon mics. You risk electrocuting the ribbon itself!!!
- Lavalier Microphones
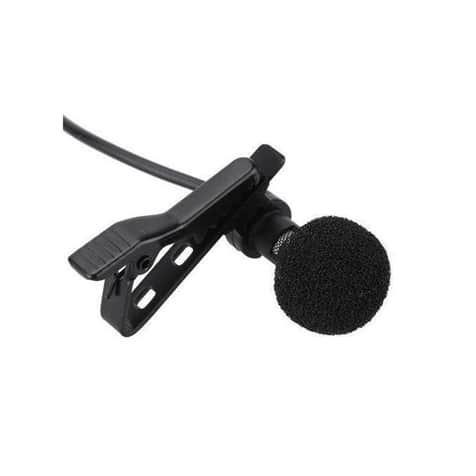
- The lavalier microphone, or lav, is an omnidirectional microphone that clips onto the costume of an actor.
- These tend to be used if an actor is moving around often. However, the placement of the mic is key. Because the lavalier microphone lacks the frequency balance of other devices, it can add an unwanted nasal quality to the dialog.
- Also, the lavalier microphone operates through a wireless system. This, of course, offers a greater degree of movement but eats through battery life rather quickly. There’s also the risk of radio interference ruining a take.
- When the option is available, the security of a wired connection is always preferred in sound recording.
What Are Microphone Polar Patterns?
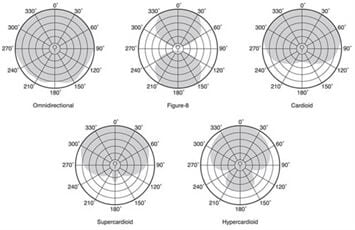
The polar pattern of a microphone is the sensitivity to sound relative to the direction or angle from which the sound arrives, or easier worded how well the microphone “hears“ sound from different directions.
What Are The Different Types Of Microphone Polar Patterns?
- Omnidirectional: These microphones have equal sensitivity at all angles. An omnidirectional mic can be placed at the center of a room faced in any direction and would be able to pick up sound coming from anywhere in the entire room.
- Bidirectional: More commonly referred to as “figure 8” polar patterns pick up sound at equal levels from the front and rear of a microphone, but do their best to ignore the sound from the sides.
- Cardioid: These mics have the most sensitivity at the front however this sensitivity begins to taper off around the sides reaching a null point with no sensitivity in the rear. These microphones are best used when monitor speakers are being used since it will help reduce feedback risk.
- Supercardioid: Similar to cardioid microphones, this microphone polar pattern offers great sensitivity in the front with a bit more focused pattern making the microphone more directional and less likely to pick up unwanted sounds in loud environments. This pattern, however, does have some rear sensitivity.
Microphone Polar Pattern Graphical Illustrations
What Are The Unwanted Noise Types During Recording Of Sound On Film?
- Controllable noise
- Controllable noise is interference that can be managed. The biggest offenders of this type of noise are refrigerators, mobile phones and personal electronics. Make sure all phones and appliances are switched off. But, especially when it comes to refrigerators, remember to power them back on after production for some very obvious reasons.
- Uncontrollable noise
- As the name suggests, uncontrollable noise originates from forces outside of one’s control. This might be a passing car or airplane, or music emanating from a nearby building. This is where professional headphones come into play. If you pick up some of this unwanted interference, make sure to announce it on set.
- Wait until the sound ceases, or if it doesn’t seem to be wrapping any time soon, move to another location. A big part of good sound design and sound recording will come by way of your experienced sound operator one set.
What Additional Sound Gear Are Important In Recording Sound On Film?
- Preamps help your sound
- As you can imagine, avoiding noise interference is vastly important in sound recording. This is where a preamplifier, or preamp, comes in handy.
- A preamp is an electronic amplifier that boosts a weak electrical signal into a stronger one. This inevitably makes the signal noise-tolerant and ready for processing into a sound mixer.
- A microphone, for example, produces a weak electrical signal. Without the assistance of a preamp, the final signal emanating from the device would be noisy and distorted.
- Now, most preamps have a switch where a user can toggle between line and microphone signal options.
- These are the sources of where the audio is coming from. A line signal typically comes from the console of a sound mixer or playback device. The audio here tends to be strong and doesn’t require significant amplification.
- As mentioned, microphones are far weaker and do require this boost.
- An important thing to remember though is that when you boost an audio signal using a preamp, you boost the noise of the preamp itself. This is another strike against the single system as in-camera preamps tend to be noisier than their dual system counterparts.
- Yes, amplification is important when recording sound. But when using a preamp, you need to be aware of your audio levels and avoid clipping.
- Clipping occurs when an amplifier is overdriven and forced to deliver an audio output that is beyond its capacity. Basically, the clipping point is the maximum level of loudness.
- Keep at least an 18 decibel (dB) difference between ambient noise and your desired signal. Following this simple rule will ensure you achieve a strong, clean signal when using a preamp.
- As you can imagine, avoiding noise interference is vastly important in sound recording. This is where a preamplifier, or preamp, comes in handy.
- Audio Cables
- Audio cables come in two varieties: balanced and unbalanced.
- A Balanced audio cable is the simplest, most cost-effective of cables. These devices possess either a mini-jack, phono tip sleeve or an RCA connector. Most carry a mono audio signal, but there are stereo varieties.
- An unbalanced audio cable is comprised of two wires. One wire is a shielding mesh wire known as the ground, which is the zero point for the signal. The other is known as the hot, which is the signal itself. This cable is more susceptible to noise interference and is typically used to cover shorter distances.
- For longer distances, the balanced audio cable is the ideal solution. Using either an XLR connection or a tip ring sleeve (TRS), these cables possess three wires instead of two. As with the unbalanced cable, there exists a shielding mesh ground wire and a hot wire. But instead of sending audio down a single wire, it is now being transferred down two wires.
- Along with the hot wire, there is now a cold wire. When an audio signal reaches the end of one wire, it reverses itself and travels down the other. This process cancels out any external noise or interference that might affect the sound recording.
- Because of this, the balanced audio cable can take a lot of strain on set without sacrificing audio quality.
- As with all of this sound recording equipment, it’s about determining what is going to benefit your movie the most.
- Audio cables come in two varieties: balanced and unbalanced.
Well, the same holds true for sound capture. In preparing for a production, the sound team should gather and test their gear. This process includes testing batteries and making sure hard drives or tapes contain enough storage space. Also, it’s important to make sure that there’s no controllable ambient sound that could cause interference. The sound team might also record what is known as a buzz track. A buzz track is a track of silence captured on a location that can be used in editing later to cover up any unwanted noise.
What Are Some Tips & Techniques For Recording Sound On Film
1. Tips When Recording Sound duties on-set
- Okay, with the preparations taken care of, it’s time for the shoot. At the start of each take, the first AD will say, “Roll sound.” The sound technician will then press the record button on their digital audio recorder.
- Moments later, the sound technician will call back with, “Speed,” or “Rolling sound.” The AD will then repeat this process with the camera and the take will proceed until the director yells “Cut.”
- This process will repeat throughout the shoot. After each take, the sound team will complete a sound report sheet. The document tells the editor what is recorded on each tape, track or hard drive.
2. Tips while conducting rehearsals
- As expected, communication is key on a film set. And nowhere is it more important than in connection with the sound recording process.
- During onset rehearsals, the sound team will discuss and determine the appropriate recording levels, as well as microphone and actor placement. For example, if the dialog is too quiet, the background noise will overpower it once the audio is compressed.
- The point, of course, is to create an environment where sound capture will be clean, and without drop off.
3. Tips When You Encounter A Problem
- With sound capture being a vital component to the moviemaking process, it’s imperative that the sound team makes the rest of the production aware of any issues that may arise during recording.
- You will be able to hear things they cannot, so don’t assume they’re aware of every issue. Fair or not, they will hold you responsible later.
- This includes ambient noise interference or quiet dialog. You may think well, what’s the big deal? We can just fix it in post production anyways.
- Yes, perhaps. But, it’s always a better idea to get the desired sound recording on set, rather than waiting weeks, or months to re-record it.
- Remember, if sound design is your business, you should have no problem voicing your concern and adding production value for $0.00.
- If you’re a filmmaker on set, and your sound team brings up an issue that you then decide to ignore…
- You can lead a horse to water, but you can’t make it drink.
4. Good distances to capture audio
- Not surprisingly, microphone distance can make or break a sound recording, and may lead to you being rehired or passed up.
- Whether you’re using a shotgun or a dynamic microphone, make sure the device is no further than three feet (1 meter) away from the subject.
- Remember, closer is always better when building a strong sound design.
- Yes, this may seem like a simple, obvious tip. But, following this rule will dramatically strengthen your audio quality.
5. Tips To Combat reverb and bouncy sounds
- Shooting locations can be unpredictable, especially when it comes to sound recording. One of the most common, and unfortunate side-effects of an indoor location is bouncy sound.
- To combat this, sound teams have developed a number of practical solutions. Adding soft textile items such as rugs, curtains or acoustic paneling to walls helps to deplete echoes.
- Every member of the sound team, from the sound mixer to the recorder, needs to possess a professional pair of headphones. When setting up a location, listen carefully to the space. Then, make a careful determination of whether additional items are required to reduce echo.


